History of Contour
the brush moves in speedy strokes across the face, the bristles expertly tracing the contours of the cheekbones, jawline, and temples. soft, feathery lines meld collectively to create a seamless combo of shadows and mild, giving the face an instantaneous carry.
as the artist works, they envision the face like a clean canvas waiting to be transformed. The diffused angles of the nose and forehead, the curvature of the lips, all demand their interest. They paint with the ability of a master, building depth and dimension with every stroke.


The result is a work of artwork that brings out the fine in the concern. Cheeks are lifted, cheekbones more pronounced, and the jawline sharper. The contours of the face are expertly crafted to decorate the capabilities and create an air of elegance and beauty.
because the artist stands back and admires their paintings, they realize that the magic of contour lies now not just in the method, however in the creativeness and creativity that brings the face to existence. Contour isn’t always simply make-up, it’s far art.
Contour steps heading
growing the right Contour: Step-by means of-Step manual
Step 1: high and Prep
begin with a smooth and moisturized face. apply a primer to assist your make-up stay in vicinity.
Step 2: foundation
practice your basis as you generally could and mix it seamlessly.
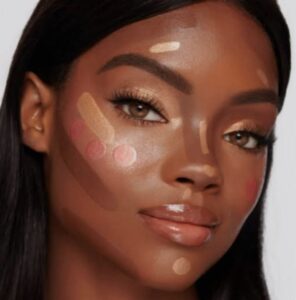
Step three: cover and highlight
Use a concealer two sunglasses lighter than your foundation beneath your eyes, the bridge of your nostril, and brow. combination with a sponge or brush. Then use a concealer that suits your skin tone to cowl any blemishes.

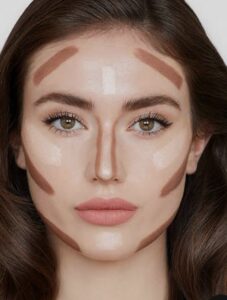
Step four: Contour
Take a contour product shades darker than your foundation and practice it along the hollows of your cheeks, jawline, temples, and the edges of your nose.
Step 5: Blush
apply blush at the apples of your cheeks, mixing it upwards in the direction of your temples.
Step 6: Powder
Use a translucent powder to set your makeup in region, specifically at the areas wherein you applied the concealer and contour.
Step 7: spotlight
end with a highlighter on the excessive factors of your face, consisting of the pinnacle of your cheekbones, bridge of your nostril, and cupid’s bow.
Step 8: completing Touches
entire your look along with your favourite lip coloration and eye makeup.
Voila! you presently have the ideal contour. do not be afraid to play with distinct products and techniques till you locate what works first-class for you.

developing the suitable Contour: A Step-via-Step guide
Step 1: Prep Your pores and skin
before starting your contour, make certain your skin is cleansed and moisturized. applying a primer can also assist make sure the contour lasts all day.
Step 2: pick the proper shade
pick a shade this is one to 2 sunglasses darker than your skin tone for contouring. opt for a matte finish to keep away from any undesirable shimmer.
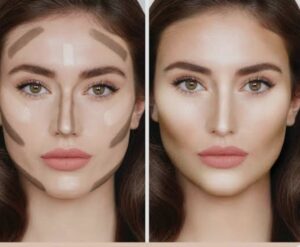
Step three: discover Your Cheekbones
the usage of your arms or a broom, discover your cheekbones by using feeling for the bone beneath your pores and skin. begin at your ear and move down closer to the middle of your face.
Step 4: practice the Contour
the use of your selected color, apply the product simply under your cheekbones, following the line you located in Step 3. Use a mild hand to build up the product slowly.
Step 5: combo, mixture, combo
the usage of a fluffy brush, blend out the contour in a round motion, making sure there are no harsh lines. be sure to mixture upwards in the direction of your hairline for a herbal look.

Step 6: spotlight
pick a coloration one to two sunglasses lighter than your pores and skin tone and use it on the tops of your cheekbones, the bridge of your nose, and your cupid’s bow for added dimension.
Step 7: Set with Powder
Set your contour and spotlight with a placing powder to make certain it lasts all day.
With those simple steps, you’ll have a ideal contour this is perfect for any occasion.
creating stunning Contours: The ultimate manual
creation:
if you’re searching out a manner to take your make-up sport to the following stage, look no further than contouring. Contouring can help intensify your pleasant capabilities and create the phantasm of a extra chiseled, described face. but wherein to start? This manual will walk you thru the steps of making lovely contours so as to turn heads.
Step 1: deciding on the right merchandise
the key to a hit contouring is locating the proper products in your skin type and tone. look for a matte bronzer or contour powder that is one to two shades darker than your herbal skin tone. keep away from something with shimmer or glitter, as this will create an unflattering, vivid look.
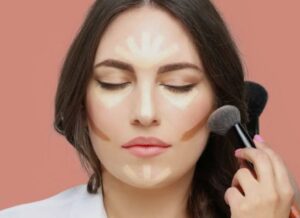
Step 2: Mapping Your Face
before you begin making use of any products, take some time to map out your face. become aware of your cheekbones, temples, jawline, and nostril. these are the areas in which you will be applying your contour.
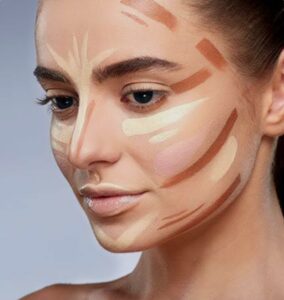

Step 3: making use of the Contour
the use of a small, angled brush, observe the contour to the areas you diagnosed in Step 2. Use light, feathering strokes to build up the color steadily. be sure to mixture nicely to avoid any harsh strains.
Step four: Highlighting
as soon as you have carried out your contour, it’s time to add some highlight. pick out a shade this is one to 2 sun shades lighter than your natural pores and skin tone and use it on the tops of your cheekbones,
Step 5: finishing Touches
to complete your appearance, upload a pop of color to your cheeks with a blush that complements your skin tone. Then, set your make-up with a placing spray to ensure your contour lasts all day.

conclusion:
Contouring can also seem intimidating at the start, but with the proper products and strategies, all and sundry can grasp this makeup artwork shape. observe those steps to create beautiful contours with a view to take your make-up game to the following level.
Thanks for watching!