Ladies kurta design history


Ladies kurta design steps
1. instantly reduce Kurta: This layout is best for a sublime but traditional appearance. they are comfortable and fashionable, suitable for all events. Pair it with palazzo pants or denims.
2. Anarkali Kurta: it’s a timeless piece that adds a royal contact on your dresser. The design starts offevolved with a tight fit at the bust after which spreads out in a manner that resembles the shape of an umbrella. ideal for festive activities or weddings.
three. Pair it with leggings or directly pants for a present day appearance.
four. Kaftan fashion Kurta: these are free and ethereal, best for the summer season. The sleeves are commonly extensive, and the kurta can be cinched at the waist.

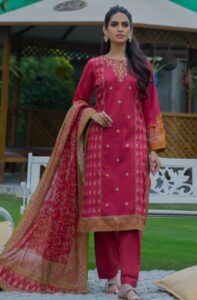
five. shirt style Kurta: those seem like a longer version of shirts, normally paired with jeans for a modern and sublime appearance.
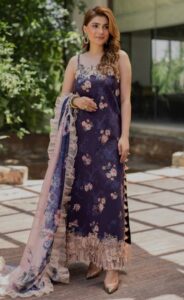
6. Layered Kurta: The layered kurta features greater layers of material, giving the garment a completely unique, chic, and elegant look.
7. uneven Kurta: This design features an uneven hemline. it could either be a slanting hemline or have one of a kind lengths at the front and back.
8. Slit Kurta: This design functions one or extra slits both at the the front, facets or returned.
9. Flared Kurta: these designs are elegant and appropriate for all frame types.
10. A-line Kurta: The A-line kurta suits at the bust and flares out toward the hem, forming the form of the letter ‘A’.


those are only a few examples of the severa designs to be had for girls kurtas. Pair them with the proper bottoms and add-ons to create the perfect search for any occasion.
1. directly cut kurta: this is a traditional kurta design wherein the outfit is instantly and reaches the knee period or underneath. it can have slits at the facet or can be without slits as properly. This layout works properly with leggings, salwars or maybe denims.
2. A-line kurta: This layout is known as for its ‘A’ form flare starting from the waist to the hem. It’s one of the most loved kurta designs, acceptable for any occasion and perfect for any frame type.
4. quick kurta: brief kurtas fall barely beneath the waist and may be paired with jeans, pants or skirts for a greater cutting-edge and modern appearance.
5. These kurtas can reach as much as the ankle and are normally paired with leggings or jeans.


6. blouse style kurta: A modern twist on the conventional kurta, those designs look similar to a shirt with collars and buttons. This style of kurta is very flexible and may be dressed up or down for any event.
7. Kaftan style kurta: inspired by the middle East, those kurtas have a flowy, loose layout with wide drop sleeves, regularly cinched on the waist with a drawstring or a belt.
8. This stylish and modern-day kurta may be paired with leggings, denims, or palazzos.
nine. front slit kurta: This form of kurta features a slit inside the the front and is commonly worn with palazzos, lehengas, or lengthy skirts.
10. This style has a a laugh, younger, and peppy vibe to it and is going nicely with slim pants or leggings.
take into account, no matter what design you pick out, it must make you feel secure and exquisite. Pair it with suitable add-ons and shoes for a whole appearance.


1. fabric choice: step one is to choose the fabric cloth. it may be cotton, silk, chiffon, georgette, or another cloth you choose.
2. color choice: pick out the color or print for your kurta. This depends in your personal desire, and whether you need a simple solid color, a vibrant print or specific embroidery.
3. dimension: the next step involves taking correct body measurements which include duration of the kurta, shoulder, bust, waist, hip, sleeve duration, etc.
4. Designing: sketch out the design for the kurta. This consists of neck designs, the reduce of the kurta, whether or not it’s A-line, immediately reduce, Anarkali, and so on., and the design for the sleeves. decide if you want aspect slits, the period of the kurta, whether you need it long, quick or medium, and different design information.
5. sample Making: After sketching out the layout, the next step is to make patterns on a paper, which acts as a blueprint for the actual sewing manner.
6. reducing: Lay out the fabric on a flat surface and vicinity the styles on it. cautiously cut out the fabric portions following the styles.


7. sewing: stitch collectively the fabric pieces following the styles. be aware of the details like attaching the sleeves, stitching the neck and so on. additionally stitch the hem and slits.
eight. finishing: add any finishing touches like buttons, embroidery, elaborations and many others. as in line with your layout.
nine. pressing: The final step is to correctly iron the kurta to offer it a neat and completed look.
10. attempting at the Kurta: eventually, strive to your newly made kurta to make certain the appropriate is ideal. If important, make the needed alterations.

This system may appear daunting for novices, but with exercise, you will be capable of layout and sew your own kurta.
Thanks for watching!