Kurta designs for girls history 

 Kurta designs for girls history 


Floral Print Kurta: This layout incorporates various floral prints and styles. they’re perfect for a casual and present day appearance.


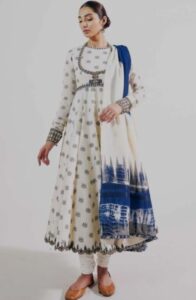
Anarkali Kurta: this is a protracted, frock-fashion kurta which is equipped on the bust and has a massive flare from the waistline. it is a totally traditional and ethnic design, perfect for special occasions.

directly reduce Kurta: that is a easy and stylish layout, appropriate for both formal and informal occasions. They can be simple or printed and generally paired with pants or jeans.


uneven Kurta: this is a present day design where the kurta does not have a good hemline. it’s elegant and pairs well with leggings or tight pants.


Kurta designs for girls steps


1. Angrakha fashion Kurta: This layout resembles a traditional Indian music instrument, referred to as ‘Angrakha’. The overlapping design provides a elegant twist to the outfit.


2. front Slit Kurta: this is a modern design where the kurta has a the front slit, typically paired with palazzo or wide leg pants.


3. high Low Kurta: The uneven design is quite contemporary. The front hem is shorter than the returned, which creates a a laugh high-low impact.

4. Anarkali Kurta: This layout is inspired by way of the ‘Anarkali’ style, commonly having a protracted, frock-style pinnacle and proposing a slim geared up backside.


5. shirt fashion Kurta: This informal kurta layout resembles an extended shirt and may be paired with denims for a sublime appearance.


6. Tail reduce Kurta: it’s far a fashionable kurta design in which the again has an extended tail, regularly reminiscent of a peplum top.


7. Dhoti fashion Kurta: this contemporary and edgy kurta design functions draped details, similar to a dhoti, frequently paired with leggings or tights.


8. A-Line Kurta: This layout starts offevolved with a tight fit on the top and flares out at the lowest, corresponding to the letter ‘A’. it is exquisite for a traditional yet ultra-modern appearance.


nine. Double Layered Kurta: It has  layers, usually in contrasting colorings, making it a versatile desire for specific occasions.

10. asymmetric Kurta: in this design, the hemline of the kurta is asymmetrical, making it a elegant preference for women who like precise and elegant clothes.


11. Kaftan style Kurta: This layout is inspired by way of the conventional middle jap kaftan. it’s comfortable and offers a boho-sublime vibe.


12. Flared Kurta: it’s a huge and at ease kurta design that flares out from the waist to the lowest, making it a terrific preference for festive wear.


thirteen. Panelled Kurta: It features panels stitched together to form the kurta. The panels can be within the identical colour or exceptional colorings, developing a fashionable sample.


14. Wrap Kurta: it is just like a wrap get dressed but in kurta shape. It wraps around the frame and ties on the waist, making it flattering for all frame sorts.

15. blouse Collar Kurta: This fashion merges the Western shirt and Indian kurta to shape a shirt collar kurta. This layout is glossy, professional, and easy to pair with a ramification of bottoms.


1. pick out Your layout: step one in creating your very own kurta is to pick out your design. you can both pick out from conventional designs, current designs, or maybe create your very own. make certain to keep in mind the kind of event you may be carrying the kurta for. For informal events, you can opt for easier designs even as for formal events, extra elaborate designs may be greater appropriate.


2. select the material: next, you may want to select the cloth in your kurta. The form of cloth you pick will rely on the design of your kurta and the occasion. for example, cotton material is good for day by day wear kurtas even as silk or georgette fabrics are notable for formal kurtas.


three. degree: before you begin sewing your kurta, it is important that you take correct measurements. this may make certain that the kurta fits you perfectly. The measurements you want to take include shoulder width, bust size, waist size, hip length, and kurta duration.


4. reducing: Now, it’s time to reduce the fabric. Mark the measurements on the cloth and cut it carefully. For novices, it is probably a good idea to use a kurta sample to help with this step.


five. stitching: begin via stitching the shoulders of your kurta. Then sew the edges together. in case your design consists of sleeves, connect them next. in the end, hem the lowest of the kurta and upload any embellishments you want.

6. attempt it on: after you are completed stitching your kurta, it’s time to strive it on. check if it suits you properly. If there are any changes needed, do it proper away.


7. Ironing: This step will deliver your kurta a finished look. Ironing the kurta will make it look neat and crisp.


8. Styling: Pair your new kurta with matching bottoms. you may pick from salwars, churidars, or palazzos depending in your fashion desire.


remember that creating a kurta can take some exercise, so don’t get discouraged in case your first try isn’t ideal. simply preserve practising and experimenting with exclusive designs and fabrics, and shortly you’ll be making your very own kurtas conveniently.


Step 1: selecting the layout and material

begin by way of deciding the design you need for the kurta. look up for brand new style trends, celebrities, fashion magazines, etc. for thoughts. After finalizing the layout, choose the cloth as a consequence. Cotton, silk, georgette, chiffon are some of the famous fabrics used for kurta.

Step 2: Taking Measurements

Take the body measurements of the girl who might be wearing the kurta. Measurements encompass shoulder, chest, waist, hips, arm circumference, duration of the kurta, and the length of the sleeves.


Step 3: Drafting the sample

Now which you have the measurements, you could begin drafting the sample on a paper or immediately on the cloth if you are confident enough. You should upload a few inches to every measurement for the seams. you will want  portions for the frame (back and front) and two portions for every sleeve.


Step four: cutting the material

After drawing the sample on the cloth, reduce the fabric using sharp cloth scissors. follow the sample carefully at the same time as reducing. ensure to go away sufficient area for seams.


Step 5: stitching the Kurta

start sewing the kurta with the aid of first stitching the shoulders together. After this, sew the side seams from the sleeve area to the kurta hem. next, connect the sleeves to the main frame of the kurta. you could upload embellishments or embroidery at this factor if favored. finally, finish the neck and hem the kurta and sleeves.


Step 6: Checking the suit

earlier than you finish sewing, attempt the kurta on to make certain it suits successfully. you may need to modify a few elements if necessary.

Step 7: finishing the Kurta

If everything suits because it need to, end your seams and press the kurta for a smooth appearance. Your kurta is now prepared to be worn.


word: if you need to add any embellishments like lace, sequins or embroidery paintings, it could be delivered both earlier than or after stitching the kurta. however, this absolutely depends on the sort of layout and look you are going for.


recollect, designing and sewing a kurta calls for time, persistence, and loads of exercise. Do not rush the manner as it is able to break your fabric or very last look of your layout.


Thanks for watching!


Leave a Comment